Getting started
 Creating a site
 Site pages
 How Super works
Customize your site
 Site options
 Custom domain
 Site design
 SEO options
 Manual Publishing
 Super Analytics
 Extensions
 Code Snippets
 Using a template
Advanced
 Custom code
 Creating a template
 Template Starter Kit
 Cloudflare proxy
Reference
 Compatible blocks
 Notion colors
 Super CSS Classes
 Product Roadmap
Creating a template
Super templates give you the ability to fully customize the appearance of your site using CSS code. The documentation below runs through the entire process.
Overview
Super templates consist of 2 key components: a duplicatable Notion page & Custom code. The best Super templates do not over complicate the use of the original Notion page and use clean, essential-only custom code only to ensure sites stay fast.
Custom Code
Wether you want to add basic adjustments or create an entire custom template, you will need to be comfortable writing CSS code. CSS is a fundamental language of the web and is responsible for adding styles to webpages. This documentation will not teach you how to write the code necessary to create Super templates but we've included a few links below to help you get started.
HTML
Although your template will not be written in HTML, it is important to understand how HTML works in order to be efficient at writing and applying CSS and understanding the structure of a web page. Check out this Introduction to HTML video.
CSS
Most if not all of a Super template is written in CSS. It's important to have a good understanding of this styling language. Check out this Introduction to CSS video.
Starting with a design
The process of template development can be a lot easier if you know how the template will look before you start writing code. Starting in design software also gives you the freedom to make variations, changes and updates to a design much quicker than in development. Some design tools even give you access to the CSS code for elements in your design. Here are some things to consider whilst designing a template:
Design with Notion in mind
All the content on a Super site comes directly from Notion, so a template design should be created with Notion's blocks in mind. The process of creating a template is one of simply changing the appearance of a Notion block and whilst you can essentially 'hack' a Notion block with CSS to make it look however you like, we recommend keeping changes to a minimum and working with aesthetic changes like fonts, color, borders, margins and padding. This ensures that people can still use Notion as expected without breaking the template.
Follow good design practise
The best Super templates all follow good design principles, this includes:
- Keeping typography clear and legible
- Using white space to balance the layout
- Sticking to only 1 or 2 primary colors
- Clutter-free, minimal aesthetic
.gif?w=1950)
Creating a Notion page
After the design is done, the next step is to re-create the design as closely as possible using blocks on a Notion page. Super supports most Notion blocks, but you can check here for a full list of compatible blocks. You can be creative with how you use Notion's blocks but try not to modify the layout too drastically. As a loose guide, we suggest using Notion's blocks in the following ways:
- Callout blocks with linked text as Call to Actions or Buttons
- Callout blocks with nested Headings and text as a section
- Gallery collection blocks as visual card-based galleries
- Heading blocks to create a typographic hierarchy
- List collection blocks as a collection of blog posts
- Multiple column blocks to break content up
- Empty blocks to add negative space
- Divider blocks to seperate content
Super Builder
If you want a little help getting started with your Notion page or you are not so proficient with design, check out the Super Builder, a drag-and-drop page builder that works right in Notion.
Create a site on Super
Once you're happy with your Notion page, the next step is to create a site with it on Super.
Please note: although you can preview custom code in the Super dashboard you will need an upgraded/paid account on Super to apply custom code to a live site. This means you can develop your site for free until you are happy and only then do you need to upgrade.
.gif?w=1950)
Developer Tools
The developer tools is a Super template developer's best friend. You will want to get familiar with how it works and what it does. Whilst developing Super templates we will mostly use the Developer Tools to traverse and inspect HTML elements and their associated styles in the 'Elements' tab.
Opening the Developer Tools
For these examples we will be working in Google Chrome. In Chrome theres a few ways to open the Developer Tools, first head to your Super Dashboard and open your site's settings (cog icon) so we can view the site preview, then use one of the following methods to open the DevTools. We recommend developing your templates in the preview so you can see live updates.
- View > Developer > Developer Tools
Cmd+Shift+i(Mac)Ctrl+Shift+i(Windows)- Three dots > More Tools > Developer Tools
- Right click an element on the page > Inspect
We won't be going into detail about how to use the Developer Tools in this documentation. Check out this video to learn more.
/w=1920,quality=90,fit=scale-down)
Using the Developer Tools to inspect Elements
Whilst the Developer Tools is open, you can hover over different HTML elements in the 'Elements' tab to highlight them on the website preview. The main reason we use this feature is to find the 'Class Name' of a particular HTML Element so we know what to style.
Super has a full set of CSS Classes that are available to view here. You can refer to this at any point during template development to check a CSS class and what styles are associated with it.
Adding your first styles
Let's customise a block together so you can see how the process works! With the Developer Tools open, we will right click the 'Heading 1' block on the page and choose 'Inspect', this will locate the Element in the Developer Tools window in the 'Elements' tab.
From here, by traversing outward we can see that the main parent Element of the heading is a h1 element with a class of notion-heading. That's all we need to know to apply custom styles to it! However, it's worth noting that if we were to inspect other heading blocks such as a 'Heading 2' block, we would see that this also uses the same class. So by applying styles to notion-heading we would be applying styles to all headings. To avoid this you would need to use a combinator class such as: h1.notion-heading to only apply styles to that class on h1 elements. This is all documented in the Super CSS classes table.
.gif?w=1950)
Next, head into the 'Code' page and open the 'CSS' tab so we can start writing some CSS code. Using the class we identified in the previous step, let's write some custom code to change the font weight and font size of the 'Heading 1' block. We recommend using the CSS rule '!important' to ensure that your style overwrites Super's default styles.
h1.notion-heading {
	font-weight: 200!important;
	font-size: 36px!important;
}.gif?w=1950)
Congratulations! You just added your first custom style 🥳 Next, using the same method as above. Let's remove the Notion Header so that our Site looks more like our design.
To recap the process:
- First, right click an element in the page and choose 'Inspect'
- Then traverse outward from the element to find the entire Notion header element (main parent)
- Next copy the class name and paste it into the CSS code box
- Apply the style using CSS code, in this case we use:
display: none!important;to hide the element and it's children.
.gif?w=1950)
The process of creating a template is to simply repeat the steps above applying styles class by class until your template is complete. It can seem like a daunting process and creating your first template might take a while but once you get familiar with the workflow and with Super's CSS classes it gets quicker and easier!
In order to apply more complex styles, it's not as simple as just adding some CSS styles to a specific class. In some cases you might want to target a very specific element that does not have its own class. In the next step we'll cover how you can do just that! ↓
Targeting specific blocks and elements
CSS Selectors and Combinators give you the ability to select specific blocks or elements within a block, however they can become quite complex very quickly! Whilst we are not going to cover what Selectors and Combinators are in detail, we will show an example of how they are used in Super Templates below. If you want to follow along with this section you can duplicate this page to your own Notion workspace and create a site with it on Super.
Example
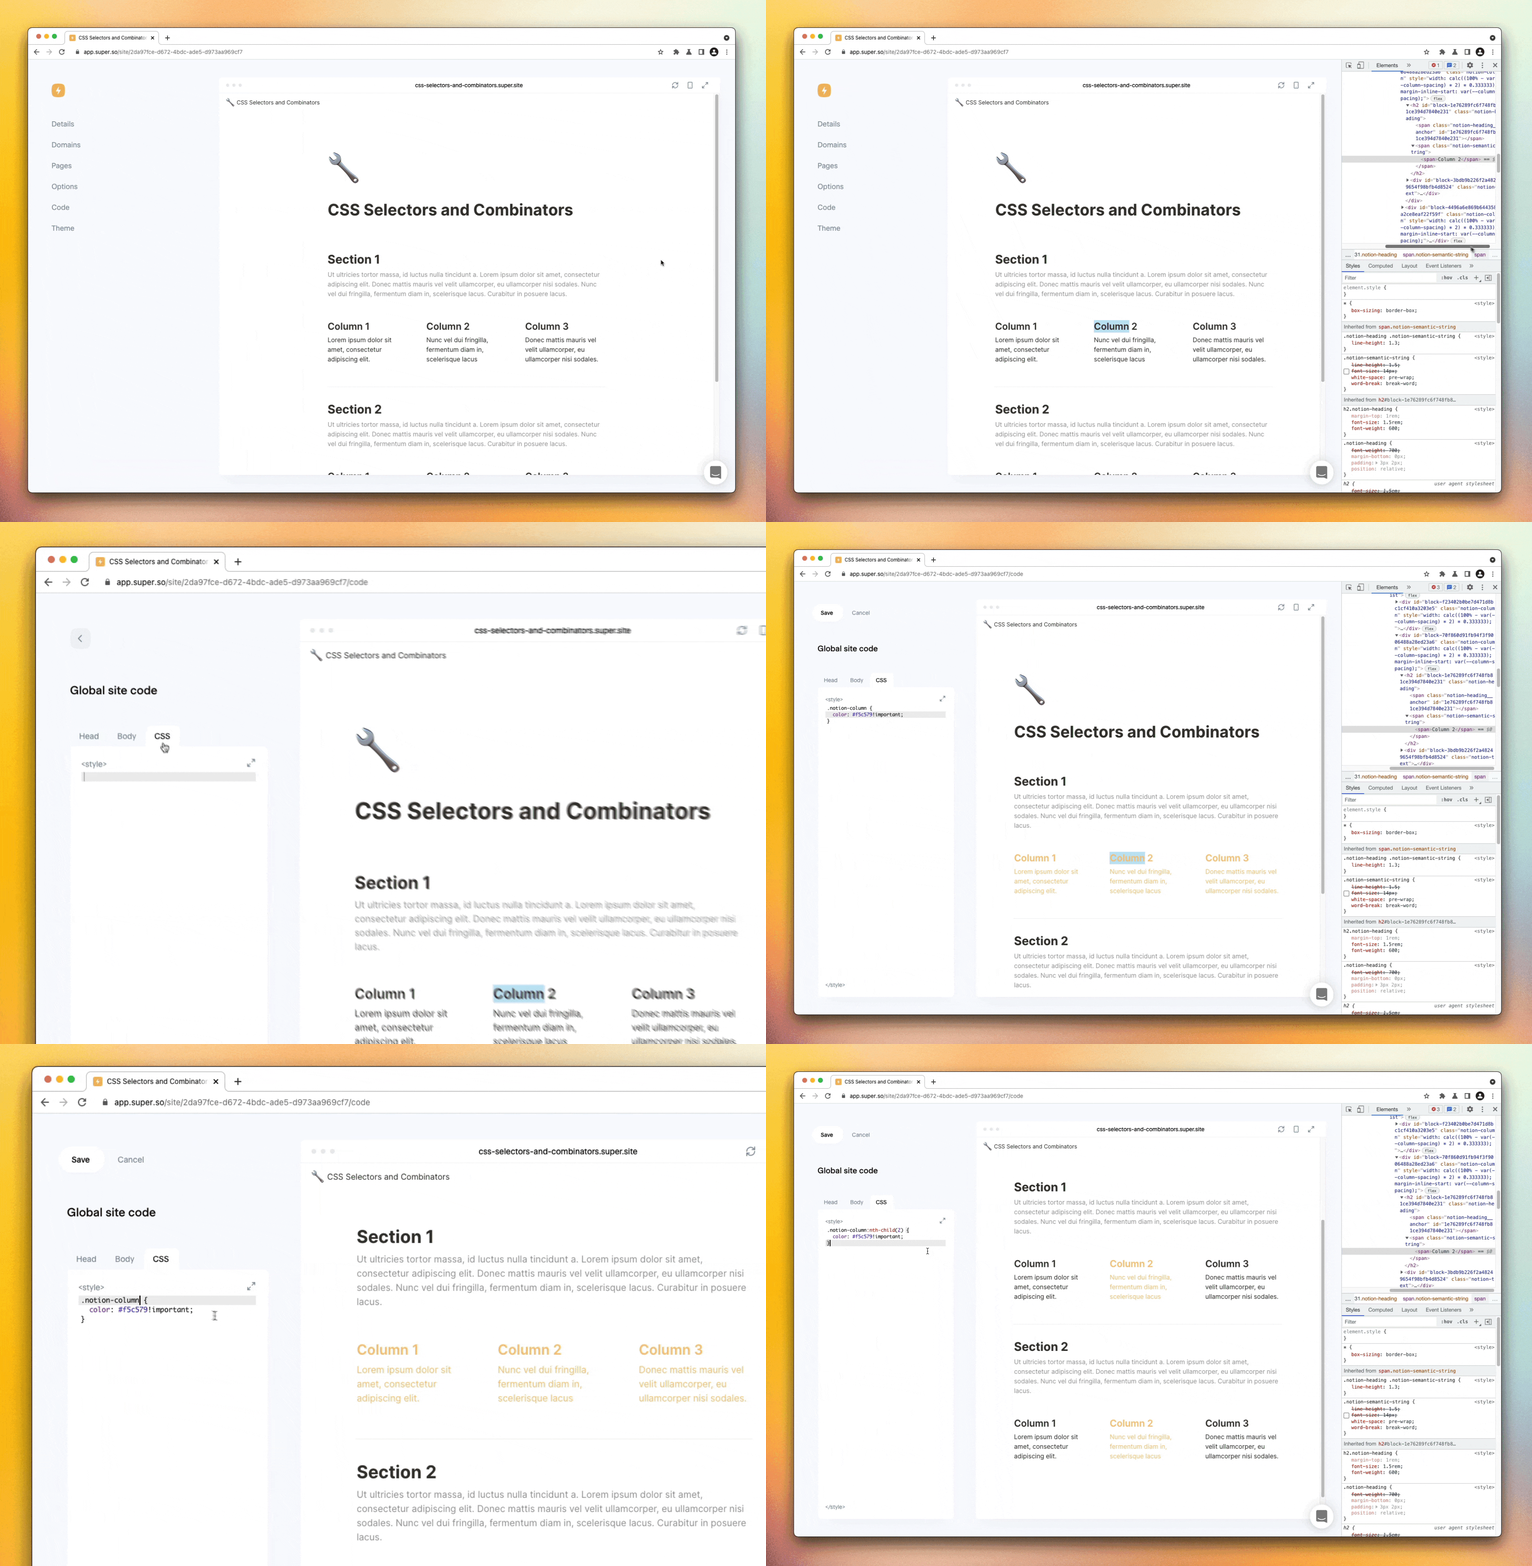
Let's say we have 3 columns but we only want to apply color styles the second column. This is a great use-case for CSS Selectors and Combinators.

Targeting the second column
First we need to identify the CSS class for the element we want to target using the Developer Tools. In our case, it's .notion-column but if we apply color styles to this class, it will affect all of our columns. In order to only select the second column, we need to utilise our first specific selector, the :nth-child() selector. We want to select the second column so we would use :nth-child(2).
.notion-column:nth-child(2) {
	color: #f0bd66!important
}
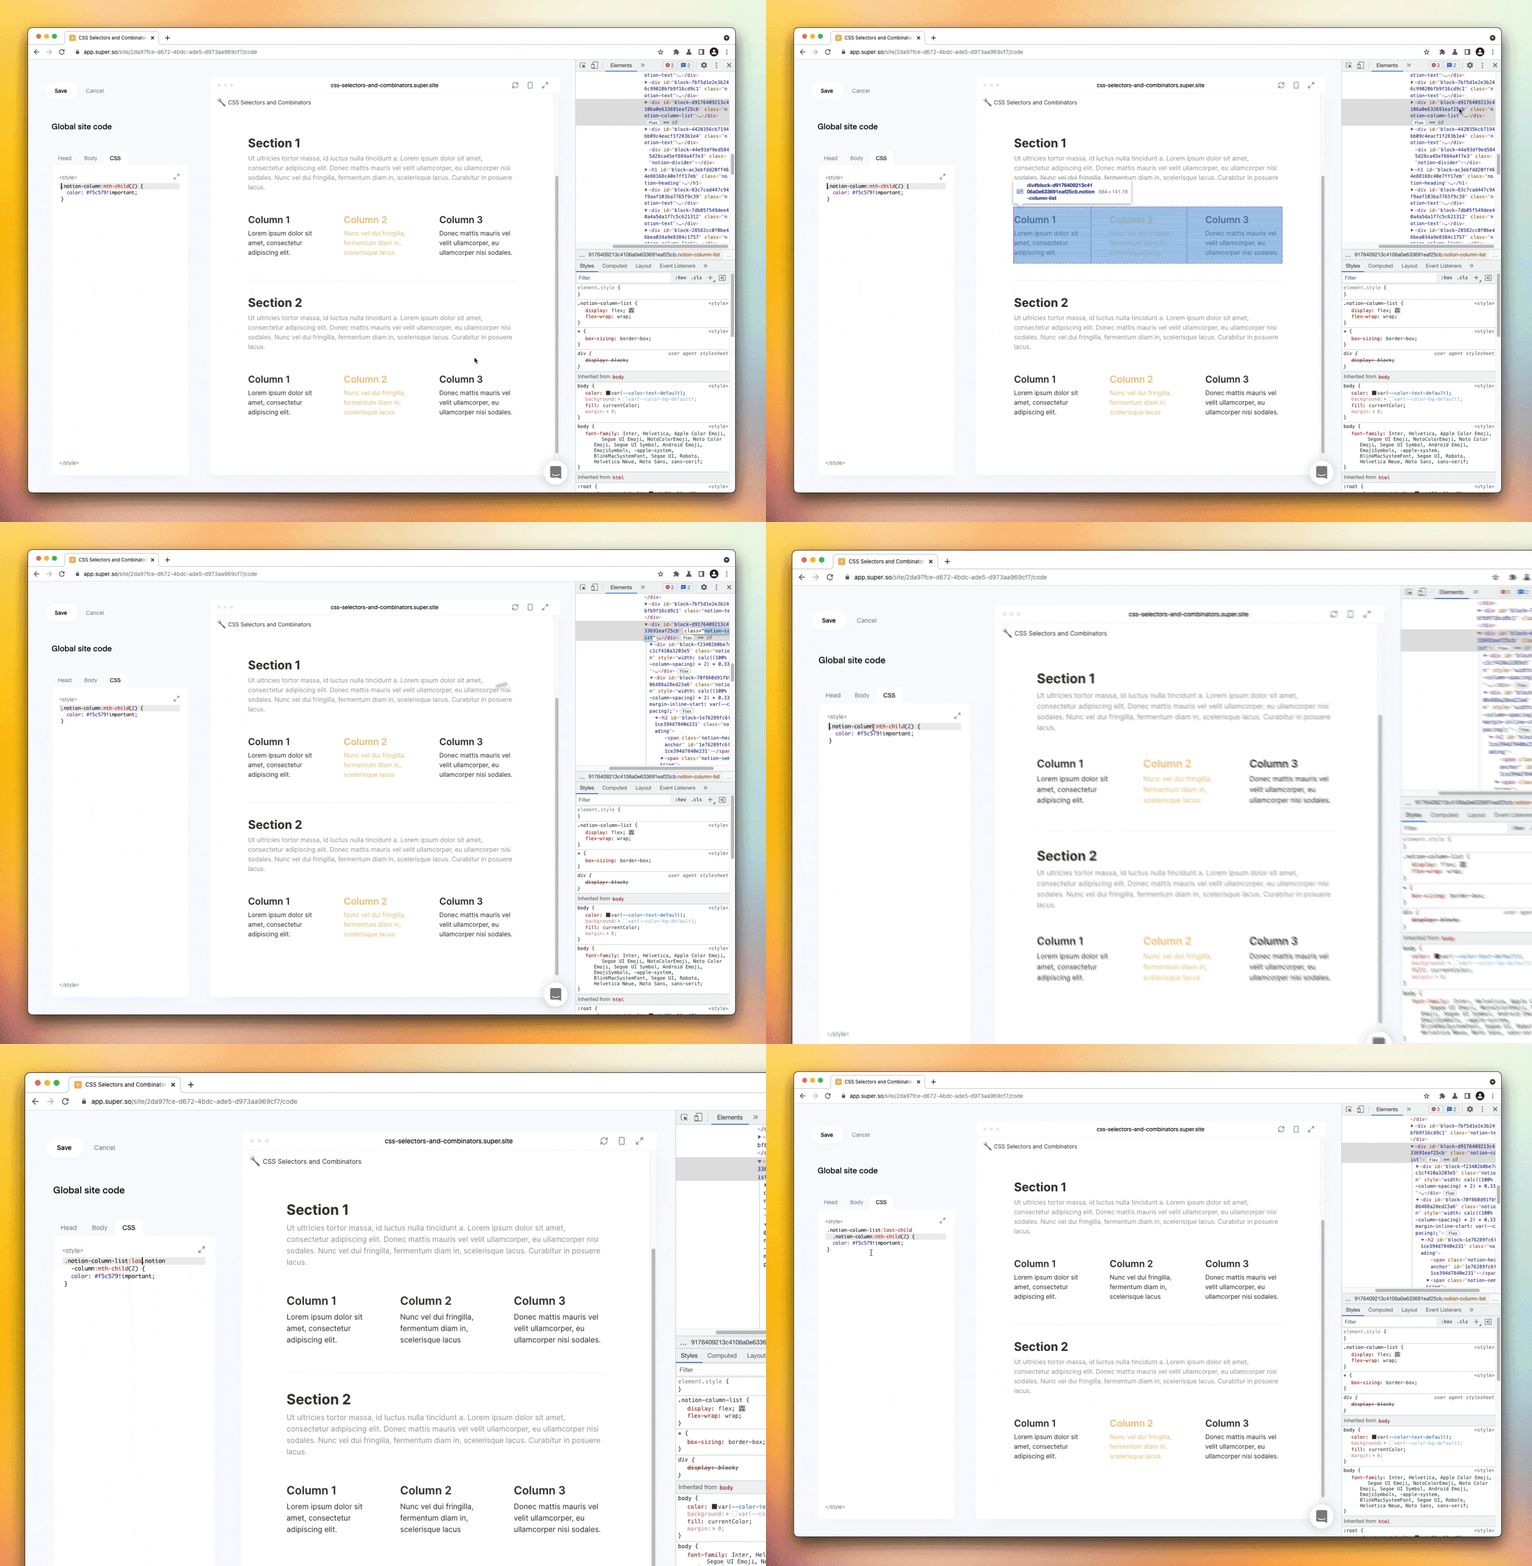
Targeting the last instance of the second column
However, if we have other column lists with multiple columns inside elsewhere on our page, it will also affect those ones too. What if we only want it to select the last instance of our column in Section 2 on our page?
In order to do this, we need yet more specific CSS selectors. The first step is to identify the common parent HTML elements of both of our column lists. In this case, our next common parent element is .notion-column-list. Then we need to apply a selector to that element to find the last copy of it. To do this we can use the :last-child selector (we could also use :last-of-type), so now our CSS selector becomes: .notion-column-list:last-child.
.notion-column-list:last-child .notion-column:nth-child(2) {
	color: #f0bd66!important
}
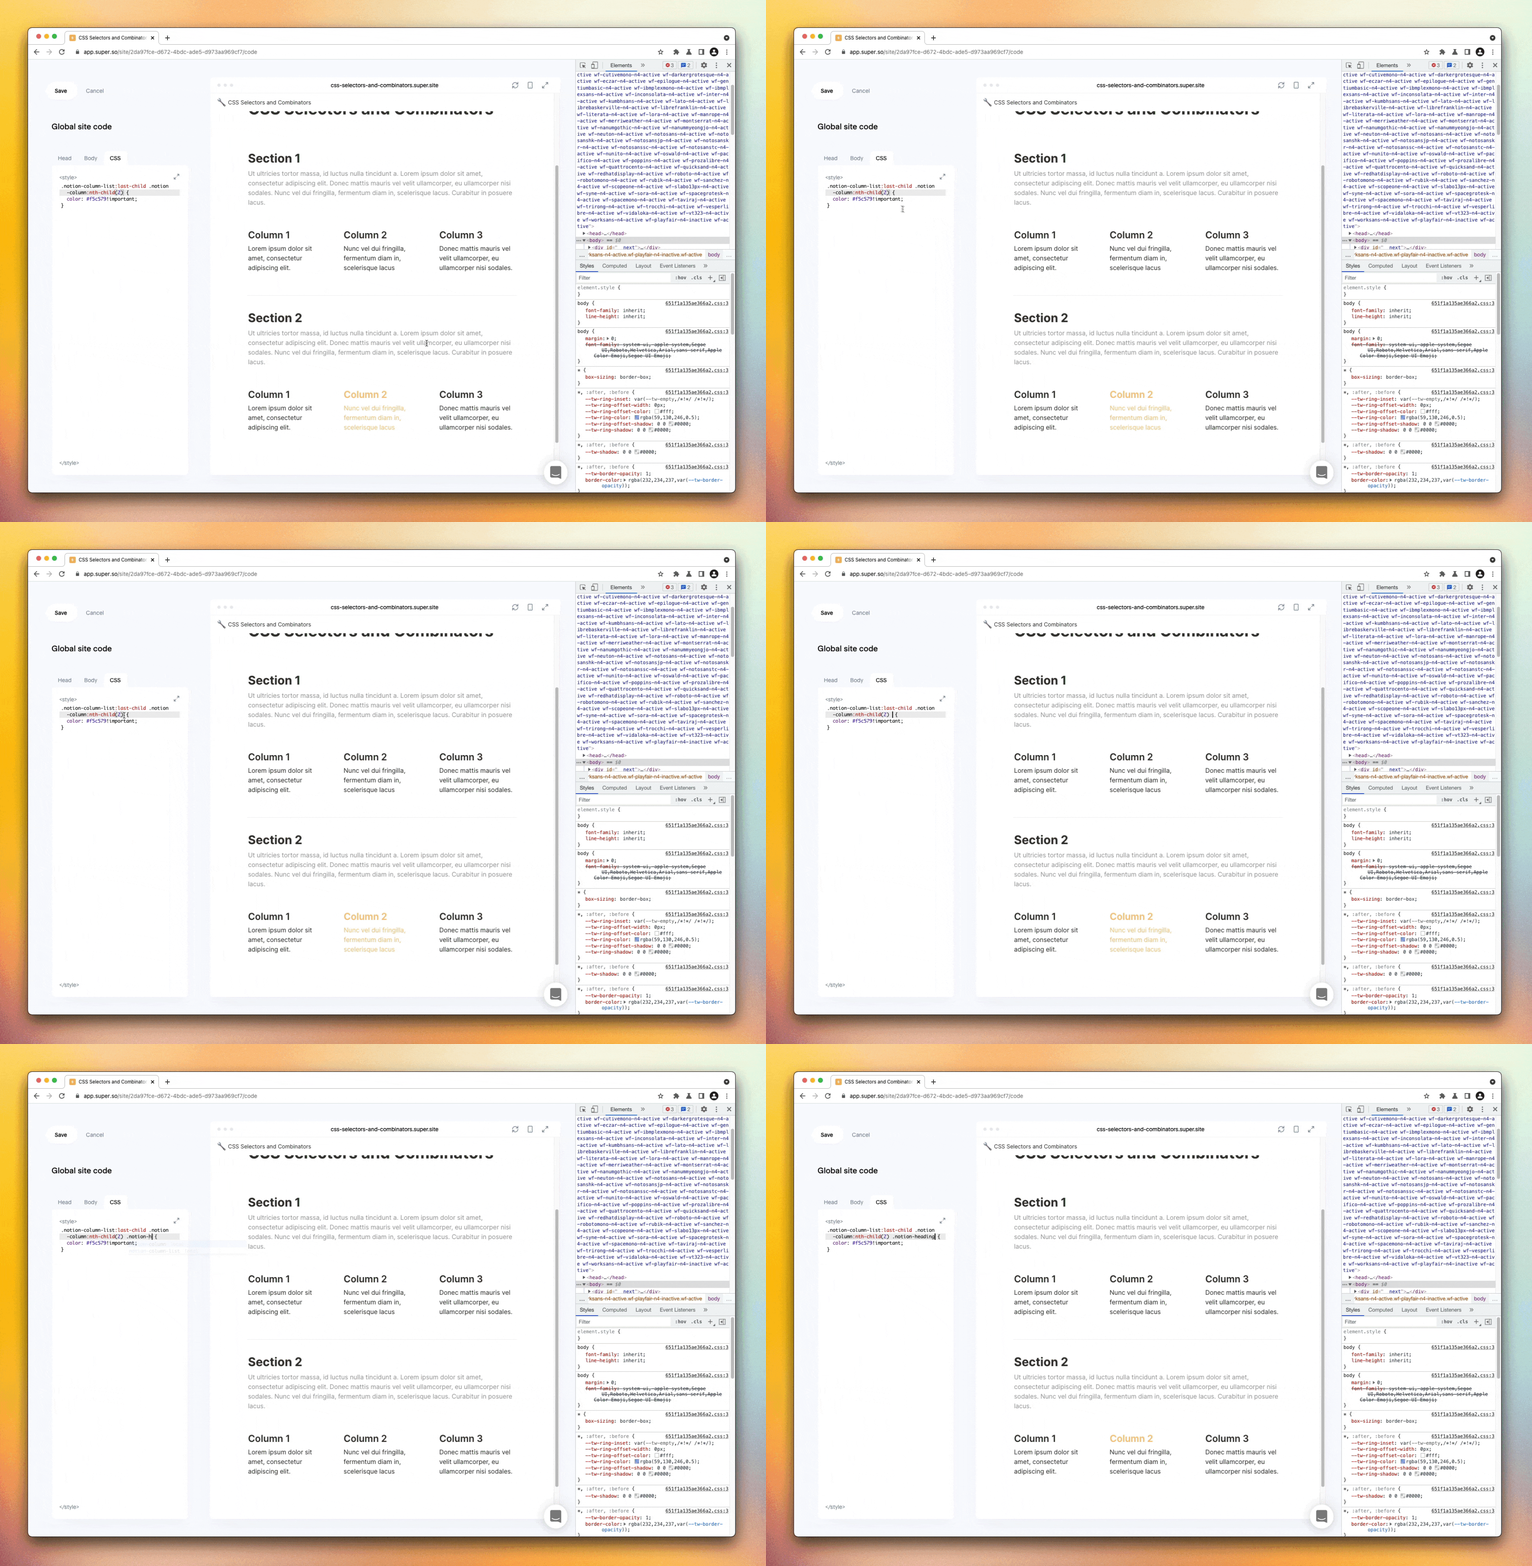
Targeting the heading within the first instance of the second column
Great, this works but what if we wanted to only color the heading in our column? We simply need to target the heading element within our column. In this case, we traverse inward and add: .notion-heading.
.notion-root > .notion-column-list .notion-column:nth-child(2) .notion-heading {
	color: #f0bd66!important
}
Awesome! ⚡️ We just covered the basics of CSS Selectors and Combinators and now you should be well on your way to creating your own Super template. CSS Selectors and combinators can take a while to get your head around so be patient with them and if you have issues, you can simply google your problem and look for results on Stackoverflow as many people will have encountered a similar issue before. Check out this video to learn more about CSS Selectors and Combinators.
Template submission guidelines
Key Information and guidelines
For us to accept templates on to the Super Marketplace, they must hold true to one of our key values: Simplicity. We want it to be as easy as possible for users to apply and customize templates. A few key technical takeaways are outlined below and should help with making decisions through the development process.
- All templates should come with simple, easy-to-navigate documentation and setup instructions
- Super templates should not over-complicate the use of Notion blocks
- Templates should not require the end user to know how to write code
- Templates should not require multiple blocks for mobile/desktop and should be fully responsive
- Create a change-log so users can track the updates to your template and make sure to include instructions on how to undo any breaking changes so users sites don't stop functioning correctly
- If you include any third-party embeds make sure to include instructions on how to replace them
Design
For Super templates to be accepted onto the Marketplace, they must be original and follow a high standard of design.
Typography
- Make sure all typography blocks are clear and legible
- Headings should not use placeholder text (Lorem ipsum)
- Paragraphs can use placeholder text (Lorem ipsum)
- Text colors should have enough contrast against the background to remain accessible
- Long and short headings and paragraphs should be used to test length and line-height bugs
Responsive
- Make sure all blocks in your template work on Desktop, and Mobile using Media queries where possible
- Generally, spacing and padding should be tighter on mobile
Images and content
- Make sure to seek permission for the use of any copyrighted images and content including photography and text
- If permission is granted, be sure to include licenses with your template
- We recommend using free assets that are allowed for resale and free redistribution or CC0-licensed graphics from sources like Unsplash
- Keep placeholder text (Lorem ipsum) to a minimum, do not use placeholder text for headings
Carry out testing
Super templates must be widely compatible and free of bugs. In order to have your site listed on the Super Market you must first conduct sufficient testing this should include:
- Testing that the template works on all browsers
- Testing that the template works on Desktop and Mobile
- Testing that the template does not have any dead links
- Testing that the template does not have any bugs
Move custom code to a CDN/Github Pages
Moving your custom code to a CDN not only makes your code more organised and easier to manage, it also makes your template easily sharable and saves users having to copy and paste hundreds of lines of custom code. Put simply, a CDN is a place to store your custom code online.
Github Pages
Github Pages can work as a CDN and it's free to use! To get started visit this page and follow the instructions. Once you've created a Repository and linked it to Github Pages follow the instructions below to upload your template files:
- Create a folder inside the repository and give it a name (use your template name)
- Then create a new file inside that folder called 'style.css'
- Next paste your Custom Code from Super into this file and commit the new file
- Head back into Super and in the Code page under the 'Head' tab, include a link to your new css file. You can use the snippet below as a guide, make sure to replace USERNAME and THEME-NAME in the URL below.
<link href="https://USERNAME.github.io/THEME-NAME/style.css" rel="stylesheet" />Providing Template Support
Super Template creators are responsible for providing support to their customers. When providing a demo of your Template please make sure to clearly include your contact details so customers know where to reach you.
Feedback, questions or support
If you have any feedback for the documentation above or require extra support. Reach out to us through our Customer Support chat via the Super Dashboard.
← Previous
Next →
On this page
- Creating a template
- Overview
- Custom Code
- Starting with a design
- Creating a Notion page
- Super Builder
- Create a site on Super
- Developer Tools
- Opening the Developer Tools
- Using the Developer Tools to inspect Elements
- Adding your first styles
- Targeting specific blocks and elements
- Example
- Template submission guidelines
- Key Information and guidelines
- Design
- Typography
- Responsive
- Images and content
- Carry out testing
- Move custom code to a CDN/Github Pages
- Providing Template Support
- Feedback, questions or support